Making a Video
5 Steps to making Films for Learning
This guide has been created to give you some simple tips and advice on how to make a short Film for Learning in school ? now all you need are the ideas!
STEP 1: MAKE A PLAN
Ask yourself ? ?What?s the film going to be used for??
Plan your film around the key subject or topic, e.g. Photosynthesis, Scientific experiment, etc.
It?s easy to get carried away by film making! A good film can be used again and again as an educational tool for future students.
What equipment will you need?
- Computer: A PC or laptop computer with Windows Movie Maker installed or other video editing program.
- Camera: Any Digital camera, Video camera or Smart phone will do the job.
TIP: learn how to use your camera before you start your filming! - Props: Use props you have available around you, e.g. nice background, lab equipment, etc.
STEP 2: RECRUIT YOUR CREW
Casting: Create clear roles for teachers and students, i.e. director, producer, sound technician and actors ? and swap roles during filming so everyone gets a go on both sides of the camera.
STEP 3: GET INSPIRED and CREATIVE
Whether it?s a science, maths or English project, use the following criteria:
- Which idea explains the topic in the best way?
- Is the scene relevant to understanding the topic?
- How much money to spend on props, are they really necessary?
- Will the final film fit to the time limit?
- What is the easiest script to get the message across?
- Be realistic! Unrealistic expectations can lead to disappointment.
Bring your ideas to life
- Create a story board for your film: start, middle and end.
- Research publicly available music clips, photos, etc.
- Script all talking scenes.
STEP 4: LIGHTS, CAMERA, ACTION!
It?sall in the detail
- Production schedule: Producing a production schedule will ensure you stick to tight timings and get the job done on time ? and that your film fits into the requirements.
- Use the production schedule to document: props / locations / equipment / crew / rehearsal times.
The perfect shot
- The camera only sees what you point it at, if you need to show detail then get a close-up.
- Take plenty of footage so when it comes to editing - you have some choice.
- Shoot all scenes at the same time if they make use of the same props or location.Even if they?re out of sync, this will save time setting it up again.
Piecing the film together ? editing
- Write a title for each clip that describes the content so you can find it quickly later on.
- Pace is important ? speeding it up or slowing it down can add to the viewer?s experience.
- Step back and look at it with a very cold eye. Be ruthless!
The sound track
- Don?t swamp your film with loud, distracting music as this could detract from the message of the film.
- When using sound, make sure it?s copyright free ? you can look this up on the internet.
The final phase
- Add titles, sound levels, fades, graphics and credits only after the film is finished.
STEP 5: SHARE YOUR FILM and INSPIRE OTHERS
Once you?ve made your film ? the fun can continue!
- Share your movie with others on youtube.com , facebook.com , vimeo.com , or other sharing networks.
- Share your audio on soundcloud.com
Appendix:
Video
Free Online Video Editors
- popcorn.webmaker.org (edit clips from youtube, vimeo, html5, soundcloud)
- youtube.com/editor
- wevideo.com
- magisto.com (for PC/ android/ iPhone)
- filelab.com (need to install plugin), must complete and download (can't save online).
- creaza.com/movieeditor
Free Apps Video Editors (Android > GooglePlay)
Free Downloads
- Video Pad (free download)
- Windows Movie Maker (Already installed on Windows PC)
- Avidemux (free download)
- VSDC (free download)
- Lightworks (free download)
- Online converter (video/ audio/ images/ ...) - online-convert.com
Screen Cast (screen recorder)
- screencast-o-matic.com
- screenr.com
- camstudio.org (free download)
Cost Money !!!
Audio
- Audio editor - FileLab (need to install plugin)
- Download audio editor (free) - Audacity + LAME encoder (to export as mp3)
- mp3 grabber - mp3grabber.net
- Online audio recording - apowersoft.com
- Online audio recording - recordmp3.org
- Upload audio files to the cloud - soundcloud.com
Animation Creators
- powtoon.com
- wideo.co
- muvizu.com
- toondoo.com
- bitstripsforschools.com
- creazaeducation.com
- scratch.mit.edu
- zooburst.com
- xtranormal.com
- kerpoof.com
More tools
- Cool Tools for Schools - cooltoolsforschools.wikispaces.com/Home
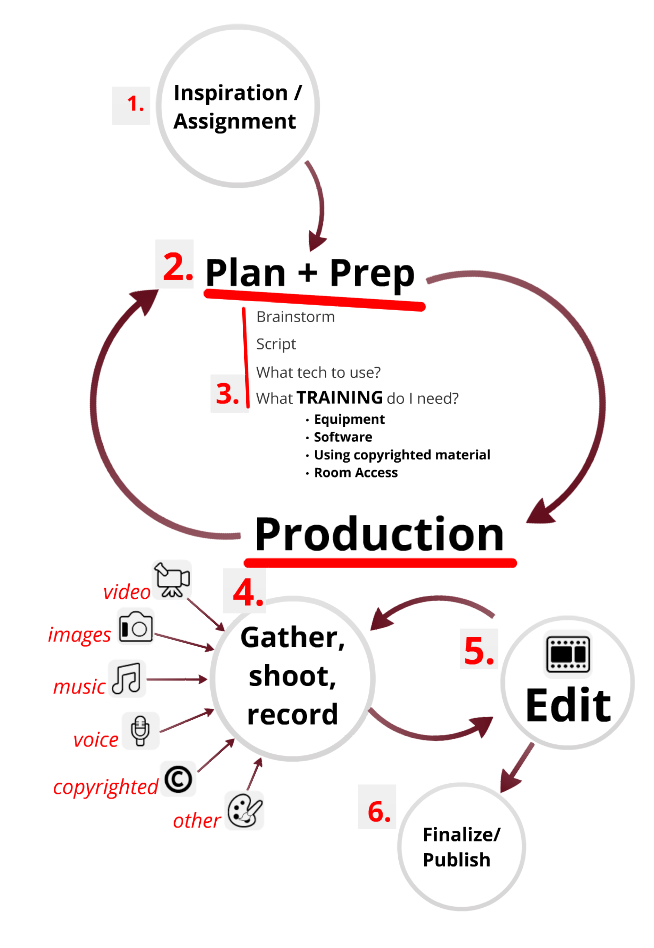
5 Steps to the prefect video chart:
